A Creator’s Guide to OpenSea
Over 50 million people around the world are independent creators. The creator economy, which consists of people creating and sharing value online, continues to grow each year. With the rise of NFTs, creatives now have a powerful way to share their work and engage directly with their audiences or communities.
Through NFT marketplaces, anyone with a crypto wallet can create and sell NFTs. There are a number of NFT marketplaces where you can get started with selling NFTs such as OpenSea, Rarible, or Foundation.
In this guide, we will go through the steps involved in selling NFTs on the largest NFT marketplace, OpenSea.
Getting Started on OpenSea
OpenSea is a peer-to-peer marketplace where anyone can buy and sell NFTs. OpenSea doesn’t require an invitation to join and offers the lowest service fee at 2.5% per transaction. It also supports multiple blockchains (Ethereum, Polygon, Solana, and Klatyn), provides configurable auctions, and lets you list NFTs without paying gas fees (also known as lazy minting).
OpenSea features the biggest selection of NFTs in the space and attracts the eyes of many collectors. Sounds interesting? Then it’s time to create your OpenSea account and start building your collections.
But, before you can create an OpenSea account, you will need a crypto wallet and some crypto. You can create a wallet, fund it, and create an OpenSea account in 4 simple steps:
1. Setting up a crypto wallet
There are a number of crypto wallets to choose from. Popular wallets include Metamask, Rainbow, and Coinbase Wallet. Most crypto wallets follow a similar set-up process:
Download and install the browser extension or app.
Set up a strong password.
Write down the secret recovery phrase given to you. (This is important! More on this below)
Pin the extension to your browser.
For more detailed step-by-step instructions, read our guide on how to set up a Metamask wallet here.
2. Purchasing crypto
You’ll need some crypto in your wallet before you can begin selling NFTs on OpenSea. Read our guide on purchasing crypto on Coinbase and check out guides for exchanges such as Kraken and Binance if you’re outside of the US.
3. Funding your crypto wallet
Once you have some crypto, you can send it from your exchange wallet (Coinbase, Kraken, or Binance) to your crypto wallet (Metamask, Coinbase Wallet, or Phantom). To begin, visit your cryptocurrency exchange, initiate a “send” transaction, and paste the address of your crypto wallet.
4. Creating an account on OpenSea
Now that you have a crypto wallet, you’re ready to create an account on OpenSea. Watch the video below to see how to set up your account.
Planning Your NFT Project
NFTs are a new and exciting way to connect with your audience or community. There are different options to choose from for your NFT project, such as:
Creating an NFT project with a large collection that combines utility, art, and community.
Building an artist profile and offering stand-alone art pieces (1/1) as NFTs.
Building an artist profile and offering your art structured in thematic NFT collections of any size.
Larger NFT projects come with utility such as early access to content, exclusive access to digital or real-life events, access to product launches, and much more. These projects are usually launched by teams. As an artist, you can join an NFT project team and work with engineers to create generative art.
If you want to release NFTs as an individual creator, you have the freedom to explore and experiment with the value behind your NFT project. Art is a perfectly good utility, but you can also play around and see how you can reward and inspire your collectors. As for pricing your NFT, it will depend on whether you’ve chosen to launch a collection or a stand-alone NFT. For collections, most NFTs are priced below 0.1ETH (< $300). It’s important to keep in mind that people who buy your NFTs will still have to pay gas fees, which can add another 0.01-0.05ETH ($100) to the price of your NFT.
Before You Start Selling NFTs on OpenSea
The sales process on OpenSea is quite simple, but there are three steps to take before you’re ready to start selling your NFTs.
1. Listing NFTs
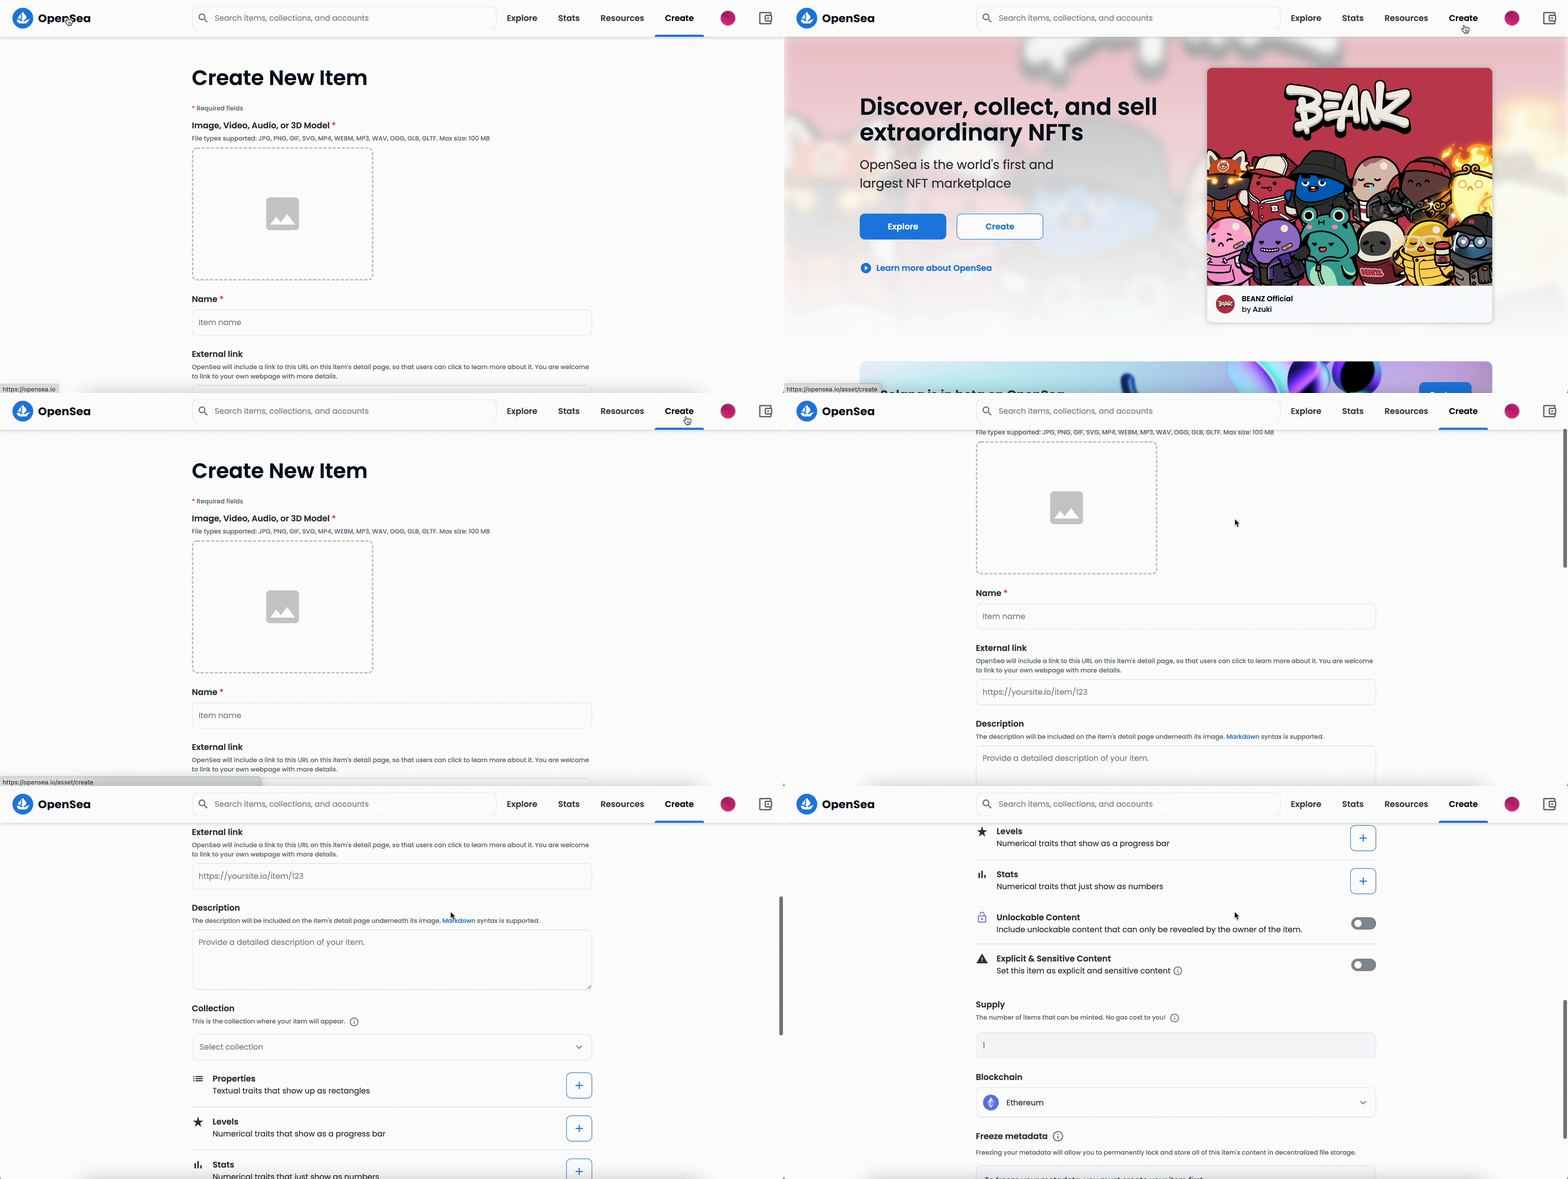
To make your NFTs available for purchase, you’ll first need to list them on OpenSea. All you have to do is upload your media file and fill out a few text fields. From the OpenSea homepage, click on the “Create” button located on the upper right corner of the website.
After uploading the media file, add an item name. You don’t have to fill out the other text boxes aside from the item name, but adding a description could be a way for you to tell the story behind your NFT. You can still edit the information after listing your NFT, but once you freeze the media and content or sell the NFT, you won’t be able to make any more changes.
If the NFT you are listing is part of a collection, hover to the collection section and click on the information icon. Click “Manage your collections here” to be redirected to the collection page, where you can create a new collection.
2. Initializing your wallet
Before you can complete your listing, you will need to initialize your wallet to make sell orders and to allow OpenSea to access your digital item once it sells. This process involves paying a gas fee, so make sure to have some ETH in your wallet.
When listing NFTs in the future, you will no longer be paying gas fees. Listing an NFT is also referred to as minting. Minting is the process of creating a new token on the blockchain. Since NFTs are a record of ownership that exist on the blockchain, it usually costs gas every time you interact with the blockchain. However, with OpenSea’s lazy minting feature, you can list NFTs without paying gas fees upfront, only once it sells. That way, you won’t be spending anything before your NFT has a buyer.
3. Freezing metadata
Anything that exists on the blockchain is immutable, which means no one can change or alter the media, information, or transaction history. On OpenSea, since your NFT is not minted on the blockchain until someone purchases it, you can still change some information. If you would like to permanently lock and store your NFTs content, you can freeze its metadata. The metadata includes the item name, the media, description, property levels, and stats.
Selling Your NFTs
After listing your NFT and initializing your wallet, you can list your NFT for sale. Go to your profile and select the NFT you want to sell. Once you’ve selected an NFT, click the “Sell” button and you will be directed to the listing page where you can set a price for your NFTs, choose the type of sale, and duration of the sale.
As a seller on OpenSea, there are different ways to list your digital items
Fixed Price Listing: Similar to items you see at a store, where customers buy items at their listed price and cannot make bids or offers. Anyone who is willing to pay the fixed price gets the item immediately.
English Auction: An English auction begins with a minimum price set by the seller. People bid on the NFT, and at the end of the auction, the highest bidder purchases the NFT.
Dutch Auction: A Dutch auction differs from an English auction because it begins with a high price that declines as time passes.
Reserve for a specific buyer: You can reserve your NFT for a specific buyer by entering their wallet address. Once you enter their wallet address, no one else but them can purchase the NFT.
Royalties
NFTs have changed the way creators can earn from the work they’ve created. Every time an NFT changes ownership, the original creator always gets a portion of the sale.
On OpenSea, you can set your creator earnings percentage up to 10%. OpenSea also takes a fee of 2.5% for the transaction. Remember to specify the payout wallet address to receive your creator earnings.
Preparing for Your NFT Launch
Once your OpenSea storefront is almost ready, you can build anticipation around your NFT project through social platforms like Twitter and Discord. Twitter is a great place to talk about your NFT project, since that is where most people discover new NFTs.
Another way to engage with your community is through Discord. On Discord, you can make announcements about your project such as previews of your NFT, launch dates, and official events.
It is good practice to have official links to your Twitter, Discord, and OpenSea profile as there is a possibility of bots and scammers who will try to imitate your profiles and scam your community members.
When thinking of a date to launch your NFT project, make sure that there are no big NFT launches happening at the same time. When the Ethereum network is busy, gas prices increase and prevent people from buying NFTs.
What’s Next?
You’re now ready to become a creator on OpenSea! We’re excited to see what you build.
Have any questions before you launch your NFT project or collection? Feel free to jump into our Discord and ask away.
To learn about how to discover NFT projects and navigate OpenSea, read our blog post here and sign up for the Surge newsletter below.


